Sunday, August 10, 2008

Creating a Woodcut from a Photo with Painter

before and after

Open a photo and clean up the background; copy the Canvas to make a new layer; create a color woodcut plate on the Canvas; create a black woodcut plate on the new layer; retouch the black plate; add clouds and texture.

At right you see John Derry's original digital photo of the pagoda, contrasted with the woodcut we'll be creating in this tutorial. (expand)

With Painter's Woodcut filter you can start with a photo and achieve a look similar to a conventional wood block print. You can simply use the color arrived at by the Woodcut filter defaults, or you can enjoy complete control over choosing the colors.

The traditional wood block printing process involves simplification of detail in the lines and color areas. Inspired by Japanese wood block prints from the 1800s, John Derry created Pagoda, which is based on one of his own digital photos. Painter's Woodcut filter helped him to reduce the number of colors in the image and to fine-tune the colors for the final artwork.

1 Choosing a photo.
Open a photo with good contrast and color. A bold image with a strong focal point will work best for this effect.

2 Cleaning up the sky.
To focus more attention on the pagoda, Derry simplified the sky by selecting it and applying a blue fill. Choose the Magic Wand in the Toolbox and click in the sky. Adjust the Tolerance in the Property Bar until most of the sky is selected; at this point, edges are most important, since you can clean up any small internal "debris" by painting on the mask later.

wand tool

Save the selection as a mask in the Channels palette by choosing Select, Save Selection.
In the Channels palette, open the eye icon to the left of the mask's name.
Choose black in the Colors palette and paint on the mask where you need to add more mask; use white to remove areas of the mask (for instance, to remove debris). To use the mask to isolate the sky, choose Select, Load Selection. (See Chapter 5 to read more about working with masks and selections.) Next, fill the selection with blue by choosing Select, Fill with Current Color.

image mask and layers
Above, left: The Image viewed with the mask eye icon open, and (center) the active selection with the blue fill applied

3 Setting up layers.

The Woodcut process is easier to control when the color elements are on a separate layer from the black elements. Derry started his layering by making a duplicate of the original image. To put a duplicate of the image canvas onto a layer, choose Select, All (Ctrl/1-A), press the Alt/Option key and choose Select, Float. In the Layers palette, turn the new layer's visibility off by toggling shut the eye icon to the left of its name.
(Above right: The visibility of Layer 1 is turned off and the Canvas is selected.)

4 Cutting the color "wood block."

In the Layers palette, click the canvas name to activate it for the colors. To access the Woodcut dialog box, choose Effects, Surface Control, Woodcut. When the dialog box appears, disable the Output Black check box. The options for Black Output will now be grayed out. In the lower portion of the window, accept the default number of colors (16), and smooth out the edges of the color blocks by adjusting the Color Edge slider to the right. (Derry set it at approximately 11.46.)

color dialogs
Increasing the Color Edge to make simpler, smoother shapes (left) and brightening the gold color (right)

When the edges were as he liked them, Derry fine-tuned a few of the colors. For instance, he chose a tan color swatch (at the bottom of the dialog box) and made the color brighter. Click on a color square to select it; a red outline will appear around it. Now that it's selected, you can choose a new color in the Colors palette and the swatch will change to the new color. To sample a color directly from the image Preview window, press the Ctrl/1 key and click on the Preview. To change the color, choose a new color in the Colors palette.

To see other areas of your image in the Preview window, drag with the grabber hand cursor to move around the image preview. When you're satisfied with the colors, click OK to accept.


What is Graphic Design?

Graphic Designers create books, websites, magazines, film titles, catalogs, typefaces, signage systems, television graphics, posters and postcards. From complex identity programs to single logos, graphic designers give a face and a “visual voice” to retail and cultural enterprises, to entertainment, manufacturing and service industries, governmental and political interests. Simply put, graphic designers give meaningful visual form to content in all media: from print to screen; business cards to billboards; computer interfaces to movie screens. But the most critical skill graphic designers offer is their unique ability to communicate specific messages through the artful manipulation of typography and images, systems and structures. Their work promotes, educates, directs, informs, exposes, clarifies, beautifies and delights.

Saturday, August 9, 2008

Funny cartoon text style

In this Adobe Photoshop tutorial we will make a funny cartoon text effect, I hope you like it..

First type in the text you want to apply this effect to, remember to use a very bold text, and with some soft edges will also help.

I used a font called "showcard gothic" which gives me a great effect.

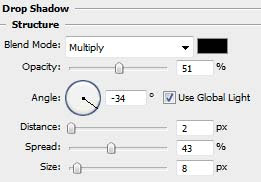
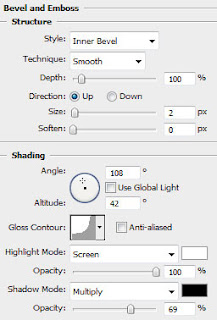
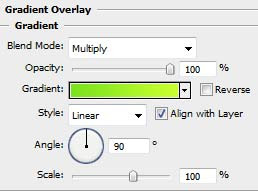
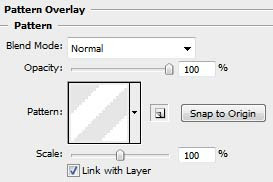
Now go to the layers panel and double click the text layer to get to the layers styles panel and give it the following settings


For the pattern overlay, you will need to create a pattern first or download a photoshop pattern and import it the your photoshop patterns, just do some google search for photoshop stripe pattern and you will find some good free photoshop patterns.

Now we will make the glossy effect at the top of every letter.

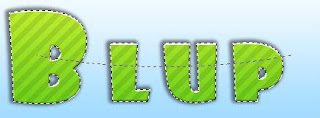
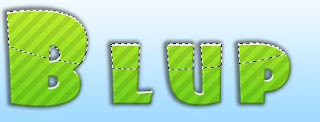
Hold down ctrl and click the letters layer in the layers panel to load the shape selection. Then with the elliptical selection tool make sure to choose the selection mode "intersect with selection" and drag a selection as shown below.


Then you should end up with a selection looking like this.

Make a new layer, fill the selection with a white color and bring down its opacity to about 20 percent (maybe less), and we are done.

The final touch I did was to add this whole effect to each letters separately and rotate them to make them look a bit funny.

Friday, August 8, 2008

how to making GIF animation

this is first tutorial how to making gif animations with adobe photoshop and adobe image ready..


STEP 1 :
Open an image and create a new layer and place the new layer over the image layer in the layer palette .
choose paint bucket tool and fill the new layer with black.
choose filter>> noise >> add noise and adjust settings as follow.


choose filters >> blur >> motion blur and adjust settings as the following:

STEP 2:
create anew layer and place it over the other layers in the layer palette and fill it with black as we do before in the other layer.
Also Apply the add noise filter but increase the amount to "61" instead of "60" and then apply the motion blur filter with the same previous settings.

try this step 2 times but when u apply the noise filter you must increase "1" to the amount (i.e. the 3rd layer "62" and the 4th "63".

Now change the mode of all 4 layers to screen and then change the fill of all layers to 60.

you should see you project like this image:

STEP 3:
select file >> Edit in ImageReady .
in the imageready show the animation palette and layers palette if they are invisible:
To do that :
choose Window >> Timeline
Window >> Layers.

in the animation window at the first frame go to the layer palette and make all layers invisible except the basic image layer and one layer.


After that create a new frame in the timeline. by clicking the "Duplicate current frame" button which is surrounded by a circle in the following image:

Select the new frame and go to the layer palette and hide the already visible layer and make another one visible. as you see in this image.

Repeat this process until you have 4 frames each one contains the basic image layer with only one rain layer.

After that set the time of the frames to 0.1 second

Select file >> Save optimized as .

from : kaskus.com